Whether you're submitting a help ticket, preparing a training slide deck, or just sending an email, creating a good screenshot (or 'screengrab', or 'screen capture') is a useful and critical skill to learn. Below are several different ways you can take screenshots, on a PC or a Mac.
On a PC
Print screen key
Most keyboards have a Print Screen (sometimes abbreviated PrtScr) key somewhere near the top-right side. If you press this key, an image of your entire screen (or screens) will be copied to your clipboard. To paste it into an email, document, or slide, just press Ctrl-V to paste.
This method is fast, easy, but not always exact — it may not be clear where you want your colleagues to focus, and they rarely need to see your entire screen (taskbar, clock, browser tabs, bookmarks, etc.)
Note: On a standard keyboard, the Print Screen key may be along the top row, to the right of the 'F' or Function keys, or it may be clustered above your arrow keys (← ↑ → ↓).
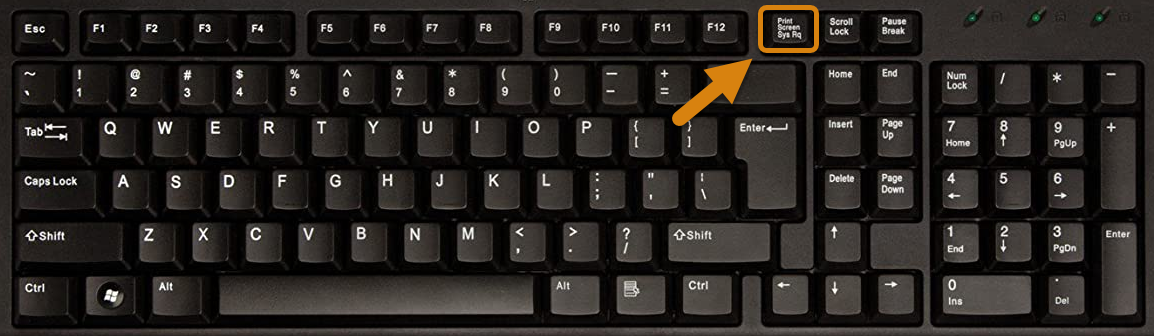
Laptop keyboards vary widely, and you often to hold an additional key such as the Windows (⊞) or Function (Fn) keys before pressing the Print Screen key.
Snipping or Snip & Sketch tool
Crafting screenshots with these tools takes a bit more time, but well-crafted screenshots can be very effective communication devices when you can't physically point to a screen like you would in real life.
Depending on which versions of Windows you're using, you likely already have a screenshot program on your PC. The legacy Snipping tool and the newer Snip & Sketch tool work the same way, though the order of steps is slightly different.
With the Snipping tool:
- Choose a mode; Rectangular Snip is usually the best option.
- (Optional) Set a delay timer; No Delay will capture the screen as-is, while a 1-5 second delay will give you time to open a menu or trigger a popup before the image is taken.
- Click New to start taking your screenshot; after your delay timer expires (if set), click and drag to draw a box around the part of the screen you wish to capture.
- Edit your screenshot; crop out unnecessary areas and use drawing tools to circle or highlight an object of interest.
- Save as an image file or copy to paste into an email or document.
With the Snip & Sketch tool, you do the same exact steps in a slightly different order:
- Click New to start now or use the dropdown menu to start a delay timer (options are 3 seconds or 10 seconds only).
- Choose a mode in the toolbar at the top of the screen; again, Rectangular Snip is usually best.
- Click and drag to draw a box around the part of the screen you wish to capture.
- Edit your screenshot; you can crop, circle, highlight, or free-hand draw.
- Save as an image file or copy to paste into an email or document.
Note: You can make the Print Screen key on your keyboard a shortcut to either the Snipping or Snip & Sketch tool. Open a Settings window (find the gear or cog icon in your Start menu) and search for the text "print screen" to find this option:

On a Mac
Taking full or partial screenshots on a Mac will vary slightly depending on your OS version, but in general the following three keyboard shortcuts are fairly standard:
- Full screenshot: Shift-Command-3
- Partial screenshot: Shift-Command-4 (then point and drag to draw a box around the selected area)
- Open Screenshot app for more options: Shift-Command-5
Third-party apps and browser extensions
There are many free and paid third-party apps and extensions you can download to take great screenshots. Most will offer all of the options available in the Snipping and Snip & Sketch tools, as well as many more advanced features:
- Auto-scrolling will capture not only what you see on-screen, but will automatically scroll to the bottom of a webpage to capture everything that isn't immediately visible.
- Pointer capture will include your on-screen pointer in the screenshot for added clarity on what to click.
- Audio/video capture allows you to take short videos or even make animated GIFs that can be useful for instructional videos.
- Advanced editing options such as stylized boxes, arrows, callouts, symbol stamps, and more.
If you want to make more professional image or video screen captures, please get in touch at help@devresults.com and we would be happy to recommend apps and extensions that we find useful.
Didn't answer your question? Please email us at help@devresults.com.